
PLINE
Draw a connected sequence of line and arc segments as one object (Arc, Close, Length, Undo).
- Type
- PLINE or PL
- On the ribbon
- Home › Draw › Polyline
- Since
- Musa CAD 0.1.0
What it asks first
Command: PLINECurrent line-width is 0.0000Specify start point:Read from Musa CAD 0.8.0 itself (musacad --dump-wiki-data), so these facts always match the release this wiki is built for (0.8.0).
PLINE draws a polyline: a chain of straight and curved segments that is a single object. Use it for an outline you want to select, offset or measure as a whole.
How it works
Section titled “How it works”Type PL and press Enter. Musa CAD shows the current line width, then asks for the start point. Keep giving points, as you would with LINE. Type A to switch to arcs and L to go back to straight lines. Press Enter to finish, or type C to close the shape.
Command: PLCurrent line-width is 0.0000Specify start point: 0,0Specify next point or [Arc/Halfwidth/Length/Undo/Width]: @60,0Specify next point or [Arc/Close/Halfwidth/Length/Undo/Width]: ASpecify endpoint of arc (hold Ctrl to switch direction) or [Angle/CEnter/CLose/Direction/Halfwidth/Line/Radius/Second pt/Undo/Width]: @0,30Specify endpoint of arc (hold Ctrl to switch direction) or [Angle/CEnter/CLose/Direction/Halfwidth/Line/Radius/Second pt/Undo/Width]: LSpecify next point or [Arc/Close/Halfwidth/Length/Undo/Width]: @-60,0Specify next point or [Arc/Close/Halfwidth/Length/Undo/Width]: ASpecify endpoint of arc (hold Ctrl to switch direction) or [Angle/CEnter/CLose/Direction/Halfwidth/Line/Radius/Second pt/Undo/Width]: CLClosed polyline created.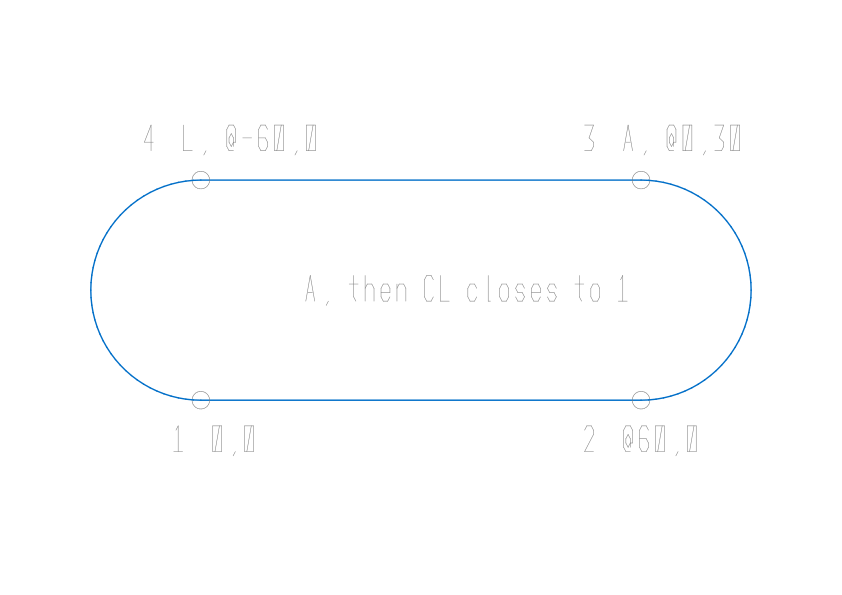
When it ends, Musa CAD says Polyline created (4 vertices). for an open polyline, giving its number of points, or Closed polyline created. for a closed one.
Options
Section titled “Options”| Option | What it does |
|---|---|
Arc (A) | Switches to arc mode: the next segments are arcs. See Arc mode. |
Close (C) | Draws a straight segment back to the start point and ends the command. You need at least three points. With fewer, Musa CAD says Need at least 3 points to close. |
Halfwidth (H) | Like Width, but you give half the width: the distance from the middle of the line to its edge. |
Length (L) | Asks Specify length of line: and draws a straight segment that long, going on in the direction of the last segment. After an arc, it carries on along the arc’s direction at its end. |
Undo (U) | Removes the last segment. With no segments left, it forgets the start point and asks for it again. |
Width (W) | Sets how wide the next segment is drawn. See Width. |
| Enter | Ends the command and keeps the polyline. |
With Dynamic Input on, boxes for the length and angle of the next segment appear beside the cursor.
Arc mode
Section titled “Arc mode”In arc mode, each point you give ends an arc that starts at the last point. The arc leaves in the direction the last segment was going, so the joint is smooth, with no corner. Hold Ctrl as you click to start the arc in the opposite direction instead.
The other arc options let you shape the arc another way:
| Option | What it does |
|---|---|
Angle (A) | Asks Specify included angle:, the angle the arc sweeps, in degrees. A negative angle goes clockwise. Then give the end point, or use CEnter or Radius. |
CEnter (CE) | Asks Specify center point of arc:, then the end point. Instead of the end, you can give the Angle or the Length of the chord, the straight distance from start to end. |
CLose (CL) | Closes the polyline with an arc back to the start point, and ends the command. |
Direction (D) | Asks Specify the tangent direction for the start point of arc:, the direction the arc leaves in. Type an angle or click a point. Then Specify endpoint of arc:. |
Line (L) | Goes back to straight segments. |
Radius (R) | Asks Specify radius of arc:, then the end point, or the Angle. |
Second pt (S) | Asks Specify second point on arc: and then Specify end point of arc:. The arc passes through the second point and ends at the end point. |
Halfwidth (H), Undo (U), Width (W) | Work as they do for straight segments. |
| Enter | Ends the command and keeps the polyline. |
The first arc of a polyline leaves in the direction of the last line or arc you drew. If there is none, it leaves towards the right (0 degrees).
Width and Halfwidth
Section titled “Width and Halfwidth”A polyline can be drawn wide, like a thick pen line. Type W and give a starting and an ending width:
Command: PLCurrent line-width is 0.0000Specify start point: (click the start point)Specify next point or [Arc/Halfwidth/Length/Undo/Width]: WSpecify starting width <0.0000>: 0Specify ending width <0.0000>: 4Specify next point or [Arc/Halfwidth/Length/Undo/Width]: (click the next point)The next segment tapers from the starting width to the ending width, which is a quick way to draw an arrowhead. You can type a width, or click a point: its distance from the last point is the width.
The ending width stays in force for the segments after it, and for the next polyline you draw. It is the PLINEWID setting, which PLINE shows as Current line-width is when it starts. Halfwidth asks Specify starting half-width and Specify ending half-width in the same way.
Good to know
Section titled “Good to know”- Esc throws away the polyline you are drawing. Press Enter to keep it.
- The finished polyline is one object and one undo step: U after PLINE removes all of it. To take back one segment while drawing, use Undo.
- An arc that cannot be made, such as one whose end point lies straight ahead on its starting direction, is refused with
*Invalid*. - A length of 0 or less is refused with
Value must be positive and nonzero.A negative width is refused withValue must be positive or zero. - Wide polylines are drawn filled, or only outlined when FILLMODE is off.
- To change a polyline later, use PEDIT. To break it into separate lines and arcs, use EXPLODE.
Compared with AutoCAD
Section titled “Compared with AutoCAD”PLINE has AutoCAD’s line and arc modes, with the same options and steps for each. Ctrl starts an arc in the opposite direction, as it does in AutoCAD.