
Dynamic Input
Dynamic Input means you work at the cursor. You type commands there, read the prompt there, pick options there, and type exact sizes there. Your eyes stay on the drawing instead of going back and forth to a command line at the bottom of the screen.
It is how Musa CAD works from the first time you start it, and it is the biggest difference you will notice from other 2D CAD programs. It feels like AutoCAD’s hands-on way of working, with everything brought to where you are looking.
Switch it on or off
Section titled “Switch it on or off”Dynamic Input is on in a new installation. Turn it on or off in any of these ways:
- Press F12.
- Click DYN on the status bar at the bottom of the window.
- Type
DSto open Drafting Settings, go to the Dynamic Input tab, and tick or untick Enable Dynamic Input (F12).
Musa CAD remembers your choice the next time it starts.
When Dynamic Input is off, the classic command line appears at the bottom of the window. Both show exactly the same prompts and accept exactly the same input, so you can switch whenever you like.
Start a command
Section titled “Start a command”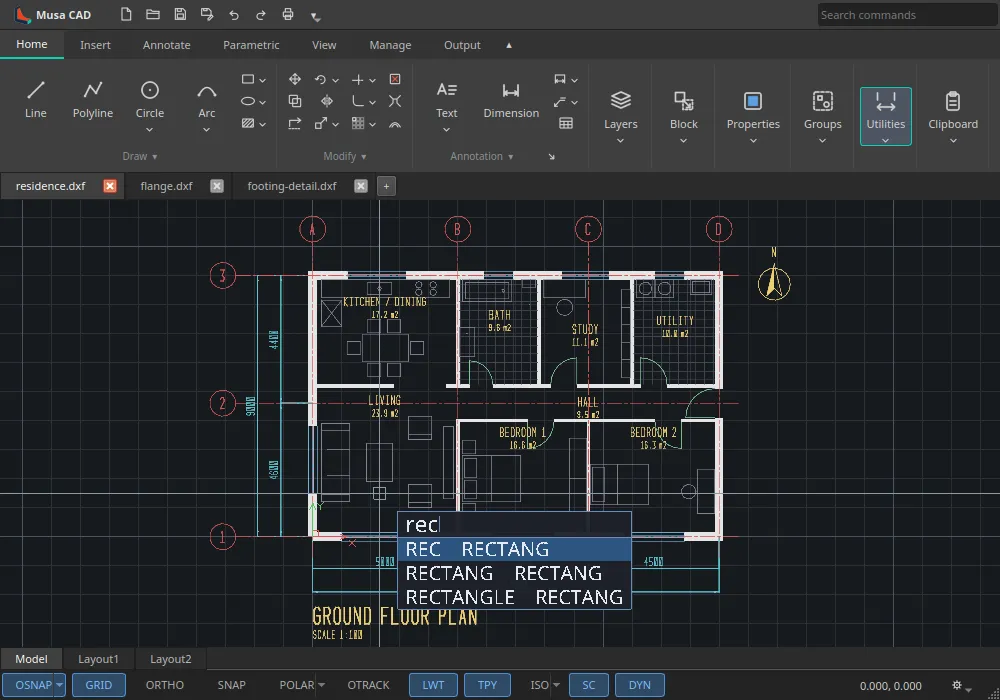
When no command is running, just start typing on the drawing. You do not need to click first.
- A small box appears at the cursor with what you type.
- Under it, a list shows the commands whose name or alias starts with those letters, each with a short description.
- Use ↓ and ↑ (or Tab) to choose one, and press Enter to run it. Or keep typing the full alias and press Enter.
- Esc clears what you typed.
Answer the prompts
Section titled “Answer the prompts”Once a command starts, its prompt appears next to the cursor, for example:
Specify next point or [Close/Undo]:- Type a value and press Enter or Space.
- Choose an option by typing its capital letters (
Cfor Close), or press ↓ to see the options as a list at the cursor and pick one. - Accept the default shown in angle brackets, like
<10.0000>, by pressing Enter without typing anything. - Cancel with Esc. It always cancels the command, even if you have half-typed a value.
Type exact sizes while you draw
Section titled “Type exact sizes while you draw”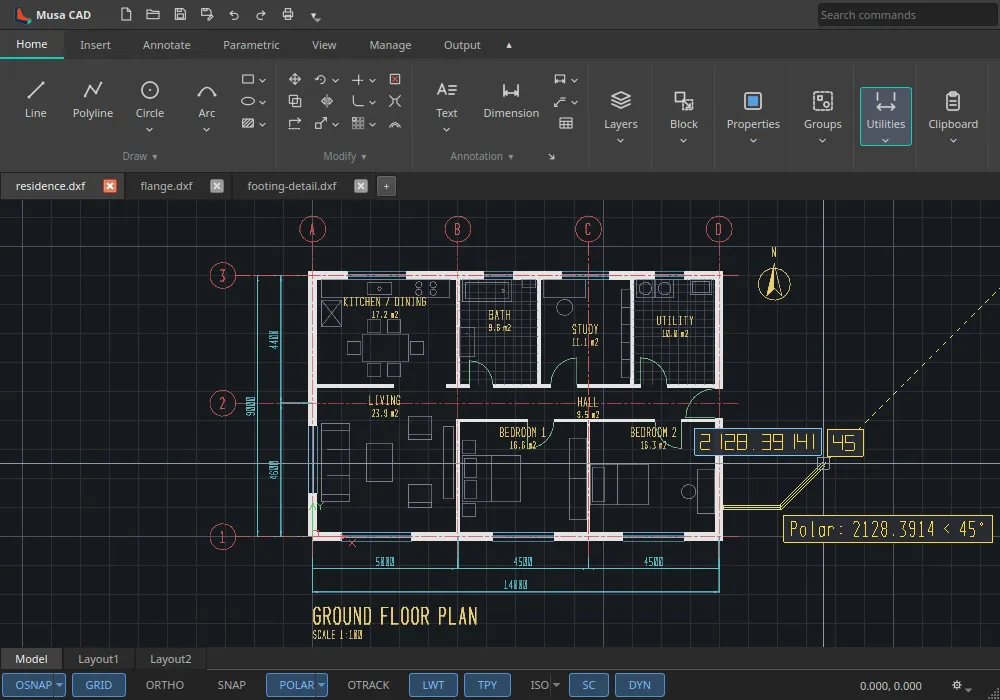
While you draw, Musa CAD shows the size of what you are drawing in small boxes stuck to the shape:
| Command | The boxes show |
|---|---|
| LINE, PLINE | the length and the angle of the segment |
| CIRCLE | the radius |
| RECTANG | the width and the height |
You do not need to click into a box. Just type a number and it goes into the first box. Then:
- Tab moves to the next box, and Shift+Tab moves back.
- A value you type is locked, and the mouse still controls the other boxes. Type a length of
50, then swing the mouse to choose the direction. - Enter or Space commits the values and the command carries on, ready for the next point.
- Pressing Enter with nothing typed ends the step. At LINE’s next-point prompt, that ends the command.
- Ortho, polar tracking and snaps still apply, so a typed length follows the angle they give.
Other commands show their prompt and value at the cursor in the same way. The boxes stuck to the shape are available for LINE, PLINE, CIRCLE and RECTANG in version 0.8.0.
Type coordinates (pointer input)
Section titled “Type coordinates (pointer input)”Wherever Musa CAD asks for a point, the cursor’s position is shown next to it.
- Type the X value, press Tab, and type the Y value.
- For a second or later point, what you type is measured from the previous point. So
10,5means@10,5, 10 units right and 5 up from the last point. This matches AutoCAD. - Put
#in front for an absolute point on the drawing, for example#10,5. - Put
@in front to make a point relative either way. 50<45means 50 units at 45 degrees.
Two settings change this. DYNPICOORDS set to 1 makes second points absolute too. DYNPIFORMAT set to 1 shows the next point as x,y instead of distance<angle.
Edit with grips
Section titled “Edit with grips”When you drag a grip (the small squares on a selected object), the boxes show how the object changes: the new length, the change in length, the angle or the radius. Type a value to put the grip at exactly that length or angle, and use Tab to move between the values. DYNDIGRIP and DYNDIVIS choose which values appear.
Every key at a glance
Section titled “Every key at a glance”| Key | What it does with Dynamic Input on |
|---|---|
| any letter | starts typing a command at the cursor (when no command is running) |
| Enter or Space | runs the command, or commits what you typed; with nothing typed, ends the step |
| Esc | cancels the command, always |
| Tab / Shift+Tab | moves between the value boxes |
| ↓ | at a prompt with options, lists the options at the cursor |
| ↑ ↓ | in the command list, choose a command |
| F12 | switches Dynamic Input on or off |
The settings
Section titled “The settings”Type a setting’s name to change it, or open its page for the details.
| Setting | What it controls | Fresh install |
|---|---|---|
DYNMODE | Which parts are on: 1 pointer input (coordinates), 2 dimensional input (the size boxes), 3 both, 0 off. A negative value is off until you press F12. | 3 |
DYNPROMPT | Show the command’s prompt at the cursor (1) or only the value (0). | 1 |
DYNPICOORDS | Second and later points relative (0) or absolute (1). | 0 |
DYNPIFORMAT | Show the next point as distance and angle (0) or as x,y (1). | 0 |
DYNDIGRIP | Which values show while you drag a grip: 1 resulting length, 2 length change, 4 absolute angle, 8 angle change, 16 arc radius. Add them up. | 31 |
DYNDIVIS | How many grip values show: 0 the length change only, 1 the change and the result, 2 everything DYNDIGRIP asks for. | 1 |
All six settings are kept between sessions, along with the on/off state.
- Never reach for the mouse to type a number. Start typing as soon as the prompt appears.
- Learn the aliases.
L,C,REC,TR,O,F,M,CO. The list under the cursor shows them as you type, so you pick them up as you go. - Use ↓ for options. You do not need to remember that Ttr is “tan tan radius”; press ↓ and pick it.
- Mix the two ways. Type a length, then let the mouse and polar tracking choose the angle.
- Try it in Your first drawing.
- See every command and its alias in the command reference.