
Your first drawing
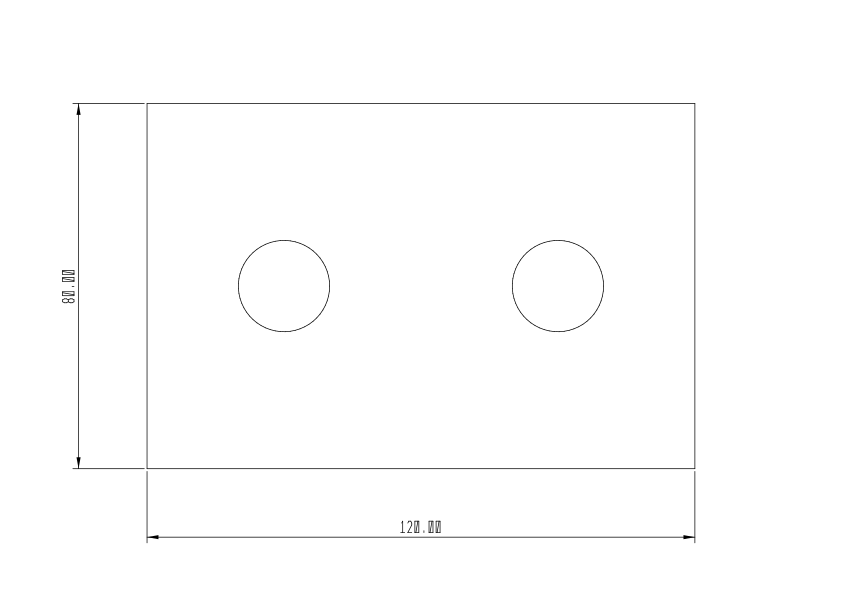
In about ten minutes you will draw the plate below: 120 units wide, 80 high, with two round holes and two dimensions. Then you will save it and print it to a PDF. Each step shows exactly what Musa CAD asks and what you type, so you can follow along.
Before you start
Section titled “Before you start”- Musa CAD opens with an empty drawing called Drawing1. Think of one unit as one millimetre.
- Just start typing. You do not need to click anywhere first. What you type appears next to your cursor, and so do Musa CAD’s questions (the prompts). This is called Dynamic Input. If you prefer a command line at the bottom of the window, press F12.
- Enter or Space confirms what you typed. Esc cancels. In the boxes below,
↵means “press Enter”. - Roll the mouse wheel to zoom in and out. Hold the middle button and drag to move around (pan).
Draw the plate
Section titled “Draw the plate”-
Type
RECand press Enter. This starts the RECTANG command. Type the first corner, then the second corner. The@means “measured from the last point”:Command line Command: RECSpecify first corner point or [Chamfer/Elevation/Fillet/Thickness/Width]: 0,0Specify other corner point or [Area/Dimensions/Rotation]: @120,80If the rectangle is too small to see, type
Z, press Enter, then typeEand press Enter. This zooms to fit everything (Zoom Extents). -
Draw the first hole. Type
Cfor CIRCLE, give the centre, then the radius:Command line Command: CSpecify center point for circle or [3P/2P/Ttr (tan tan radius)]: 30,40Specify radius of circle or [Diameter]: 10 -
Draw the second hole. Musa CAD remembers the last radius and offers it in angle brackets, so you only need to press Enter:
Command line Command: CSpecify center point for circle or [3P/2P/Ttr (tan tan radius)]: 90,40Specify radius of circle or [Diameter] <10.0000>: Enter
Tip: pressing Enter when no command is running repeats the last command. That is a quick way to start the second circle without typing C again.
Add the dimensions
Section titled “Add the dimensions”-
Type
DLIfor DIMLINEAR. It asks for the two points to measure between, then where to put the dimension line. You can type the points, or hover over a corner until the Endpoint snap marker appears and click:Command line Command: DLISpecify first extension line origin or <select object>: 0,0Specify second extension line origin: 120,0Specify dimension line location or [Mtext/Text/Angle/Horizontal/Vertical/Rotated]: 60,-15The dimension shows the width, 120. Musa CAD measures it from the two points, so the number is always right, even if you change the plate later.
-
Now the height, on the left side. Musa CAD works out whether the dimension is horizontal or vertical from where you put the dimension line:
Command line Command: DLISpecify first extension line origin or <select object>: 0,0Specify second extension line origin: 0,80Specify dimension line location or [Mtext/Text/Angle/Horizontal/Vertical/Rotated]: -15,40
Made a mistake? Press Ctrl+Z to undo. To move a dimension’s text, click the dimension, then drag the small square on its text.
Save it
Section titled “Save it”Press Ctrl+S. Because the drawing has never been saved, the Save window opens with the file type Musa CAD (*.musa). Name it first-part.musa. The tab at the top now shows the file name. From now on Ctrl+S saves straight away, and Ctrl+Shift+S is Save As.
A .musa file is Musa CAD’s own format. It is plain text, so you can even open it in a text editor. Files saved by version 0.8.0 need 0.8.0 or newer to open. Older files always open in newer versions.
Print it to PDF
Section titled “Print it to PDF”Press Ctrl+P, or type PLOT. In the Plot window, choose:
- Printer/plotter: PDF File…
- Paper size: A4, Orientation: Landscape
- Plot area: Extents (the whole drawing)
- Scale: Fit to paper. For a real drawing you would pick a fixed scale instead.
- Plot style (CTB): Monochrome (all black), which is how a workshop usually wants a drawing.
Click Preview… to check the sheet, then Plot and choose where to save the PDF. The PDF is made of real lines, not pixels, so it stays sharp however far you zoom in.
You can also print it without opening Musa CAD at all. The picture at the top of this page was made exactly that way:
musacad --plot first-part.musa first-part.pdf --paper A4 --landscape --monochromeWhat you learned
Section titled “What you learned”- Start commands by typing their short names:
REC,C,DLI,Z. - Read the prompt: options are in
[square brackets], the default is in<angle brackets>, and Enter accepts it. - Type exact points:
30,40is a point on the drawing,@120,80is measured from the last point, and@50<45means 50 units at 45 degrees. - Dimensions measure the drawing; you never type their numbers.
- Save as
.musa, print to PDF.
- A tour of the interface names every part of the window.
- Dynamic Input shows how to draw faster by typing values right at the cursor.
- The drawing from this page is yours to keep: download first-part.musa and open it with File ▸ Open.