
PEDIT
Edit a polyline, or several (Multiple): close/open, join, width, vertices, fit, spline, decurve, reverse.
- Type
- PEDIT or PE
- On the ribbon
- Home › Modify (slide-out) › Edit Polyline
- Since
- Musa CAD 0.4.0
What it asks first
Command: PEDITSelect polyline or [Multiple]:Read from Musa CAD 0.8.0 itself (musacad --dump-wiki-data), so these facts always match the release this wiki is built for (0.8.0).
PEDIT changes a polyline after you have drawn it. A polyline is one object made of connected straight and curved segments, as PLINE draws. With PEDIT you can close it, join more pieces to it, give it a width, smooth it into a curve, or edit its corners, called vertices, one by one.
How it works
Section titled “How it works”Type PE and press Enter. Click the polyline. Musa CAD then lists the options. Type the capital letter of an option and press Enter. The list comes back after each one, so you can make several changes. Press Enter on its own when you are done.
Command: PESelect polyline or [Multiple]: (click the polyline)Enter an option [Close/Join/Width/Edit vertex/Fit/Spline/Decurve/Ltype gen/Reverse/Undo]: FFit.Enter an option [Close/Join/Width/Edit vertex/Fit/Spline/Decurve/Ltype gen/Reverse/Undo]: WSpecify new width for all segments: 1Width set to 1.0000.Enter an option [Close/Join/Width/Edit vertex/Fit/Spline/Decurve/Ltype gen/Reverse/Undo]: EnterThe list offers Close for an open polyline and Open for a closed one. After you close it, the list offers Open, and the other way round. If you type a point instead of clicking, Musa CAD cannot tell which kind it is, and offers both.
Options
Section titled “Options”| Option | What it does |
|---|---|
Multiple (M) | At the first prompt. Asks Select objects: so you can edit several polylines at once. See Editing several at once. |
Close (C) | Adds a segment from the last vertex back to the first. A polyline needs at least three vertices to close. |
Open (O) | Removes the closing segment of a closed polyline. |
Join (J) | Asks Select objects to join: again and again. Click each line, arc or polyline to add, then press Enter. They become part of this polyline where their ends touch. |
Width (W) | Asks Specify new width for all segments:. Gives every segment the same width. 0 makes it a thin line again. |
Edit vertex (E) | Edits the vertices one at a time. See Editing vertices. |
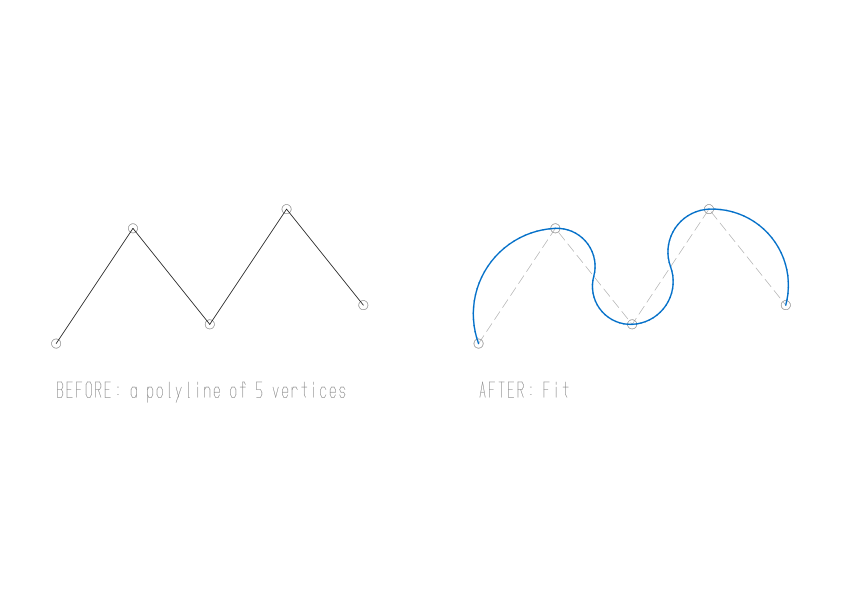
Fit (F) | Replaces each segment with two arcs, so the polyline becomes a smooth curve that passes through every vertex. It needs at least three vertices. |
Spline (S) | Makes a smooth spline curve that uses the vertices as its frame. The curve starts and ends at the end vertices, and is pulled towards the others without passing through them. |
Decurve (D) | Takes away Fit or Spline and goes back to the vertices you placed. On a polyline that was not fitted, it makes every arc segment straight. |
Ltype gen (L) | Asks Enter polyline linetype generation option [ON/OFF] <Off>:. With OFF, a dashed linetype starts its pattern again at each vertex. With ON, the pattern runs on smoothly past the vertices. A new polyline drawn in Musa CAD has it ON. Enter means OFF. |
Reverse (R) | Turns the polyline round, so its first vertex becomes its last. Arcs and tapered widths follow. |
Undo (U) | Takes back the last option you used in this PEDIT. If there is none, Musa CAD says Nothing to undo. |
| Enter | Ends the command. |
Turning a line or arc into a polyline
Section titled “Turning a line or arc into a polyline”If you click a line or an arc, Musa CAD asks first:
Command: PESelect polyline or [Multiple]: (click a line)Object selected is not a polylineDo you want to turn it into one? <Y> ↵Enter an option [Close/Join/Width/Edit vertex/Fit/Spline/Decurve/Ltype gen/Reverse/Undo]: JSelect objects to join: (click the next line)Select objects to join: (click the arc after it)Select objects to join: Enter3 objects joined into a polyline.Enter an option [Close/Join/Width/Edit vertex/Fit/Spline/Decurve/Ltype gen/Reverse/Undo]: EnterPress Enter or type Y to go on. Type N to pick something else. The line or arc becomes a polyline when you use the first option, and Musa CAD says so, for example Converted to a polyline. Closed. If you press Enter at the option list straight away, it stays as it was.
To skip the question every time, set PEDITACCEPT to 1.
Editing vertices
Section titled “Editing vertices”Edit vertex puts an X on the first vertex and asks:
Enter a vertex editing option [Next/Previous/Break/Insert/Move/Regen/Straighten/Tangent/Width/eXit] <N>:
The X marks the current vertex. Most options work on it, or on the segment that leaves it.
Enter an option [Close/Join/Width/Edit vertex/Fit/Spline/Decurve/Ltype gen/Reverse/Undo]: EEnter a vertex editing option [Next/Previous/Break/Insert/Move/Regen/Straighten/Tangent/Width/eXit] <N>: EnterEnter a vertex editing option [Next/Previous/Break/Insert/Move/Regen/Straighten/Tangent/Width/eXit] <N>: MSpecify new location for marked vertex: @0,10Vertex moved.Enter a vertex editing option [Next/Previous/Break/Insert/Move/Regen/Straighten/Tangent/Width/eXit] <N>: X| Option | What it does |
|---|---|
Next (N) | Moves the X to the next vertex. Enter does the same. |
Previous (P) | Moves the X back one vertex. |
Break (B) | Remembers the current vertex and asks Enter an option [Next/Previous/Go/eXit] <N>:. Move the X to a second vertex and type G (Go): the part between the two vertices is removed. Go at the same vertex splits the polyline there. On a closed polyline, what is left becomes one open polyline. eXit cancels the break. |
Insert (I) | Asks Specify location for new vertex: and adds a vertex after the X. |
Move (M) | Asks Specify new location for marked vertex: and moves the vertex at the X. |
Regen (R) | Redraws. Nothing changes. |
Straighten (S) | Like Break, but Go replaces everything between the two vertices with one straight segment. |
Tangent (T) | Asks Specify direction of vertex tangent:. Type an angle, or click a point to give the direction. A Fit, now or later, passes through this vertex in that direction. |
Width (W) | Asks Specify starting width for next segment <0.0000>:, then Specify ending width for next segment, offering the starting width. Sets the width of the segment that leaves the X. Different widths make a taper. |
eXit (X) | Goes back to the main list of options. |
Each change reports what it did, such as Vertex inserted., Vertex moved., Segment width set., Tangent set., Broken. or Straightened.
Fitted polylines keep their vertices
Section titled “Fitted polylines keep their vertices”After Fit or Spline, the polyline remembers the vertices you placed. Its grips stay on those vertices. Close, Open, Reverse, and the vertex editor’s Insert and Move work on them, and the curve is fitted again afterwards. Decurve goes back to them.
One exception: setting a segment’s width with the vertex editor’s Width on a fitted polyline keeps the curve as drawn and stops it being fitted. Musa CAD says PEDIT: the width is set on the polyline as drawn; it is no longer fitted.
The shape Spline makes is set by two settings: SPLINETYPE, 5 for a quadratic curve or 6 for a cubic one (the default), and SPLINESEGS, how many short pieces each segment is drawn with (8 by default).
Editing several at once
Section titled “Editing several at once”Type M at the first prompt, select the objects and press Enter. Polylines, lines and arcs are all used; lines and arcs become polylines without the question. Anything else is left alone.
Command: PESelect polyline or [Multiple]: MSelect objects: (select the objects) EnterEnter an option [Close/Open/Join/Width/Fit/Spline/Decurve/Ltype gen/Reverse/Undo]: JEnter fuzz distance or [Jointype] <0.0000>: 2Enter an option [Close/Open/Join/Width/Fit/Spline/Decurve/Ltype gen/Reverse/Undo]: EnterClose, Open, Width, Fit, Spline, Decurve, Ltype gen and Reverse apply to all of them, and Musa CAD says how many changed, for example 3 objects changed. Edit vertex is not offered here.
Join works differently with several. It asks for a fuzz distance: ends that are this close together are joined, even if they do not touch. Jointype (J) asks Enter join type [Extend/Add/Both] <Extend>:, which decides how a gap is closed:
- Extend lengthens the straight segments on each side until they meet.
- Add puts a new straight segment across the gap.
- Both extends where it can and adds a segment where it cannot.
The join type is kept for next time. MPEDIT starts PEDIT straight in this mode.
Good to know
Section titled “Good to know”- Each option you use is its own undo step, so U after PEDIT takes the changes back one at a time.
- Musa CAD checks what you clicked when you choose an option. If nothing was there, it says
PEDIT: nothing under the pick.If it was not a polyline, line or arc, it saysPEDIT: select a polyline (or a line or arc to convert). - Edit vertex works only on a polyline. On a line or arc that has not been turned into one yet, Musa CAD says
PEDIT: the vertex editor works on a polyline. - A negative width is refused with
Requires a width of zero or more. - Too few vertices are refused:
PEDIT: a polyline needs three vertices to close.,PEDIT: Fit needs three vertices.orPEDIT: not enough vertices for a spline. - A Break between the two ends of an open polyline is refused with
PEDIT: breaking between the two ends would leave nothing. - With the plain Join, the ends must touch exactly. If they do not, Musa CAD says
JOIN: the selected objects don't share endpoints.Use Multiple’s Join with a fuzz distance to close small gaps. - An option Musa CAD does not know gets
Enter Close, Open, Join, Width, Edit vertex, Fit, Spline, Decurve, Reverse, Undo or Enter to finish. - Esc ends the command. The changes you already made stay.
Compared with AutoCAD
Section titled “Compared with AutoCAD”PEDIT has AutoCAD’s options and offers Close or Open the way AutoCAD does. MPEDIT, PEDIT’s Multiple from the start, comes from AutoCAD’s Express Tools. A fitted polyline’s placed vertices are kept in the drawing and in DXF files.