
HATCH
Fill an enclosed area with a pattern or solid color.
- Type
- HATCH or H or BHATCH
- On the ribbon
- Home › Draw › Hatch
- Hatch Editor (contextual tab) › Boundary › Re-hatch
- Since
- Musa CAD 0.1.0
What it asks first
Command: HATCHPick internal point or [Select objects/Undo/seTtings]:Read from Musa CAD 0.8.0 itself (musacad --dump-wiki-data), so these facts always match the release this wiki is built for (0.8.0).
HATCH fills an area with a pattern of lines, a solid colour or a gradient. Use it to show a cut surface in a section, or to shade part of a plan.
How it works
Section titled “How it works”Type H and press Enter. Click inside an area that is closed all the way round. Musa CAD finds the boundary around the point and fills it. Click inside more areas if you like, then press Enter to finish.
Command: HPick internal point or [Select objects/Undo/seTtings]: (click inside the shape)Hatch created.Pick internal point or [Select objects/Undo/seTtings]: EnterThe first time, the pattern is ANSI31, evenly spaced lines at 45 degrees, at scale 1 and angle 0. To change it, type T for seTtings before you click.
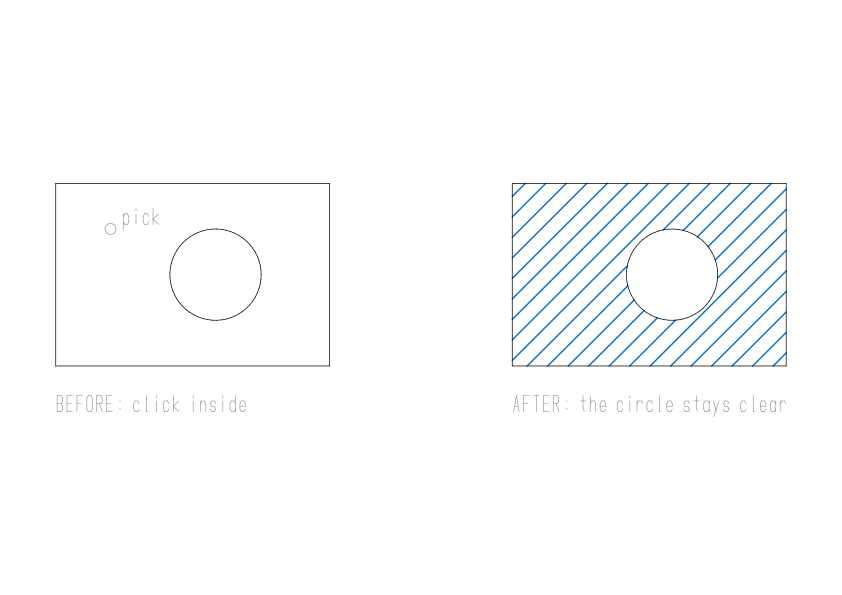
A closed polyline or circle inside the area is left clear, as an island. All the areas you pick in one HATCH become one hatch object, unless HPSEPARATE is 1.
Options
Section titled “Options”| Option | What it does |
|---|---|
Select objects (S) | Instead of clicking inside, select closed objects: closed polylines, circles, whole ellipses or closed splines. Press Enter to fill them. An object inside another one becomes a hole. |
Undo (U) | Takes back the last fill made in this HATCH. If there is none, Musa CAD says Nothing to undo. |
seTtings (T) | Sets the pattern, then its scale and angle. See below. |
| Enter | Ends the command. |
Pattern, scale and angle
Section titled “Pattern, scale and angle”Type T at the first prompt:
Command: HPick internal point or [Select objects/Undo/seTtings]: TEnter a pattern name or [?/Solid/User defined/Gradient] <ANSI31>: ANSI37Specify a scale for the pattern <1.0000>: 2Specify an angle for the pattern <0>: EnterPick internal point or [Select objects/Undo/seTtings]: (click inside the shape)Hatch created.- Pattern name: type the name of a pattern. Type
?to list them all. The built-in patterns are ANGLE, ANSI31 to ANSI38, BOX, BRICK, CHECKER, CLAY, CONC, CORK, CROSS, DASH, DOTS, EARTH, GRASS, GRAVEL, GRID, HEX, HONEY, INSUL, LINE, NET, NET3, PLAST, SQUARE, STARS, STEEL, TRIANG and ZIGZAG. - Scale: a larger scale spreads the pattern out. A smaller one packs it closer.
- Angle: turns the pattern, in degrees.
- Solid (
S): fills the area with the hatch’s colour. No scale or angle is asked. - User defined (
U): plain parallel lines. Musa CAD asksSpecify angle for crosshatch lines <0>:,Specify spacing between the lines <1.0000>:andDouble hatch area? [Yes/No] <N>:. Yes adds a second set of lines at right angles. - Gradient (
G): shades from the hatch’s colour to a second colour. Musa CAD asksSpecify second colour as r,g,b <255,255,255>:andSpecify gradient angle <0>:. The GRADIENT command starts HATCH with a gradient.
The pattern, scale and angle are kept for the next hatch until you close Musa CAD.
A name that is not built in is looked for in the .pat pattern files in the drawing’s folder, and in the support folder inside Musa CAD’s settings folder. A pattern found there is stored in the drawing. A name found nowhere says Unknown pattern "NAME"; ? lists them., with the name you typed.
Good to know
Section titled “Good to know”Valid hatch boundary not found.means the area is not closed, or you clicked outside every closed area. Look for a small gap. -HATCH has a gap tolerance under Advanced that can bridge small gaps.- Lines, arcs, circles, ellipses, splines and polylines can close an area. Construction lines, text, dimensions, blocks and other hatches cannot.
- Objects that are selected when HATCH starts are filled at once, with the current pattern, and the command ends. A hatch you just made stays selected, so press Esc to clear it before you start HATCH again. Otherwise Musa CAD tries to fill the hatch itself and says
Valid hatch boundary not found. - Each fill is its own undo step. U after HATCH takes back the last one.
- Esc ends HATCH. The fills you already made stay.
- A new hatch follows its boundary. Move, rotate or scale the boundary, or drag its grips, and the hatch goes with it. Set HPASSOC to 0 to make new hatches stay as they are drawn.
- How big a new hatch’s pattern is drawn also depends on MEASUREMENT. With 1 (metric), the standard patterns are drawn 25.4 times as large as with 0 (imperial).
- If hatches do not show at all, check FILLMODE. When it is off, hatches are hidden.
- When only hatches are selected, the ribbon shows the Hatch Editor tab, where you can change their pattern, scale and angle.
Compared with AutoCAD
Section titled “Compared with AutoCAD”HATCH asks its questions at the command line, starting with AutoCAD’s Pick internal point and using its Valid hatch boundary not found. message. The built-in patterns are Musa CAD’s own, written from the public .pat format rather than copied from AutoCAD’s acad.pat. You can use AutoCAD’s patterns by putting its .pat file in one of the folders above, but typing a name that matches a built-in pattern picks the built-in one.