
DIMANGULAR
Create an angular dimension between two lines.
- Type
- DIMANGULAR or DAN
- On the ribbon
- Home › Annotation › Linear › Angular
- Annotate › Dimensions › Linear › Angular
- Since
- Musa CAD 0.1.0
What it asks first
Command: DIMANGULARSelect arc, circle, line, or <specify vertex>:Read from Musa CAD 0.8.0 itself (musacad --dump-wiki-data), so these facts always match the release this wiki is built for (0.8.0).
DIMANGULAR dimensions an angle. Pick two lines and it measures the angle between them, with an arc and an arrow at each end. It can also measure how far an arc turns, an angle on a circle, or the angle between three points you click.
How it works
Section titled “How it works”Type DAN and press Enter. Pick the first line, then the second. Move the cursor: an arc follows it between the lines, with the angle written on it. Click to place the arc. The dimension is drawn and the command ends.
Two lines that cross make four angles. You get the one your click stands in, and the arc passes through the point you click. Click between the lines for the narrow angle, or on the other side of one line for the wide angle next to it.
Command: DANSelect arc, circle, line, or <specify vertex>: (pick the first line)Select second line: (pick the second line)Specify dimension arc line location or [Mtext/Text/Angle/Quadrant]: (click between the two lines)Angular dimension placed.Dimension created from object.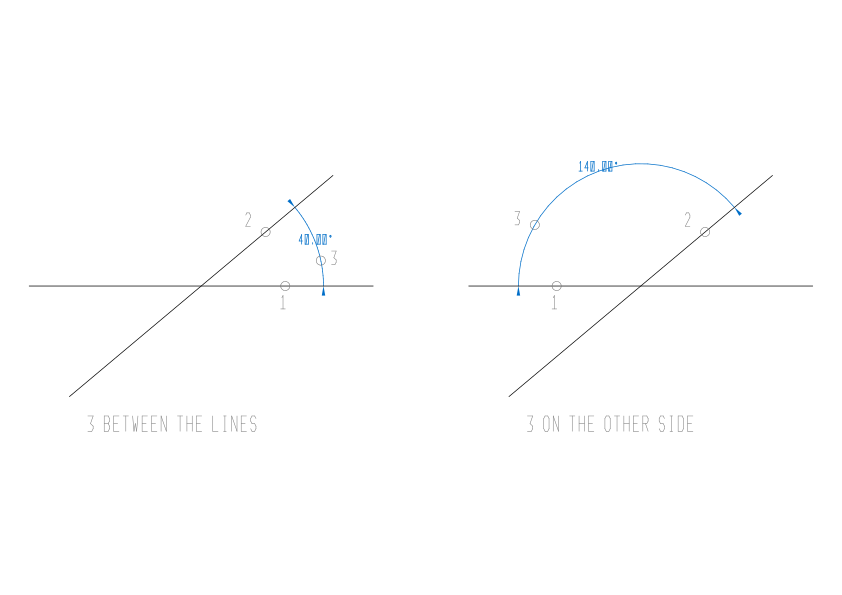
Other things you can pick
Section titled “Other things you can pick”What is under the cursor at the first pick decides the next prompt:
- An arc: Musa CAD measures the angle the arc spans, seen from its centre. It goes straight to the arc location prompt.
- A circle: the point where you picked the circle is the first end. Musa CAD asks
Specify second angle endpoint:, and measures the angle between the two points, seen from the centre. - Three points: press Enter at the first prompt. Click the vertex (the corner of the angle), then a point on each side.
Command: DANSelect arc, circle, line, or <specify vertex>: EnterSpecify angle vertex: 0,0Specify first angle endpoint: 50,0Specify second angle endpoint: 0,30Specify dimension arc line location or [Mtext/Text/Angle/Quadrant]: (click inside the corner)Angular dimension placed.With three points, or with a circle, clicking outside the angle measures the rest of the turn instead. That is how you dimension an angle bigger than 180°.
Options
Section titled “Options”These options are offered while you place the arc. After you choose one, Musa CAD asks for the arc location again.
| Option | What it does |
|---|---|
Mtext (M) or Text (T) | Type your own text at Enter dimension text (<> for the measurement):. <> stands for the measured angle. Text without <> replaces it. Press Enter without typing to use the measurement. |
Angle (A) | Turns the text. At Specify angle of dimension text: type an angle in degrees. 0 or Enter stands it upright again. |
Quadrant (Q) | Choose the angle with a point of its own. At Specify quadrant: click inside the angle you want measured. After that, the arc can go anywhere you click, even outside that angle. |
Good to know
Section titled “Good to know”- A “line” can be a line or one straight segment of a polyline.
- If you type a point at the first prompt with nothing under the cursor, Musa CAD takes it as a pick on a line.
- Two parallel lines have no angle between them. Musa CAD then says
Could not dimension that object -- select a line, circle, or arc.when you place the arc, and draws nothing. - The value follows the current dimension style. The Standard style writes decimal degrees with two places, such as
40.00°. Change the angle format in DIMSTYLE, on the Primary Units tab. - The arc has a grip, so you can drag it nearer or further later. ROTATE, MIRROR and SCALE keep it.
- When you save as DXF, the arc’s distance from the vertex is not written. Read back, the dimension shows the smaller angle.
- Esc cancels without drawing anything. U removes the dimension in one step.
Compared with AutoCAD
Section titled “Compared with AutoCAD”As in AutoCAD, the place you click decides which angle is measured, and Quadrant lets you choose it separately.
- Add more angles round the same vertex with DIMCONTINUE.
- Dimension the length along an arc with DIMARC.
- Change the angle format and arrows with DIMSTYLE.