
OFFSET
Create a parallel copy of a curve at a specified distance.
- Type
- OFFSET or O
- On the ribbon
- Home › Modify › Offset
- Since
- Musa CAD 0.1.0
What it asks first
Command: OFFSETCurrent settings: Erase source=No Layer=Source OFFSETGAPTYPE=0Specify offset distance or [Through/Erase/Layer] <Through>:Read from Musa CAD 0.8.0 itself (musacad --dump-wiki-data), so these facts always match the release this wiki is built for (0.8.0).
OFFSET makes a copy of an object that runs alongside it at a fixed distance. Use it for wall thicknesses, borders, rings and any shape that must stay the same distance from another.
How it works
Section titled “How it works”Type O and press Enter. Musa CAD shows the current settings and asks for the distance. Type it, then pick the object to copy and click on the side where the copy should go. Musa CAD asks for the next object, so you can offset several in a row. Press Enter when you are done.
Command: OCurrent settings: Erase source=No Layer=Source OFFSETGAPTYPE=0Specify offset distance or [Through/Erase/Layer] <Through>: 6Select object to offset or [Exit/Undo] <Exit>: (pick the shape)Specify point on side to offset or [Exit/Multiple/Undo] <Exit>: (click outside it)Offset created.Select object to offset or [Exit/Undo] <Exit>: (pick the circle)Specify point on side to offset or [Exit/Multiple/Undo] <Exit>: (click inside it)Offset created.Select object to offset or [Exit/Undo] <Exit>: Enter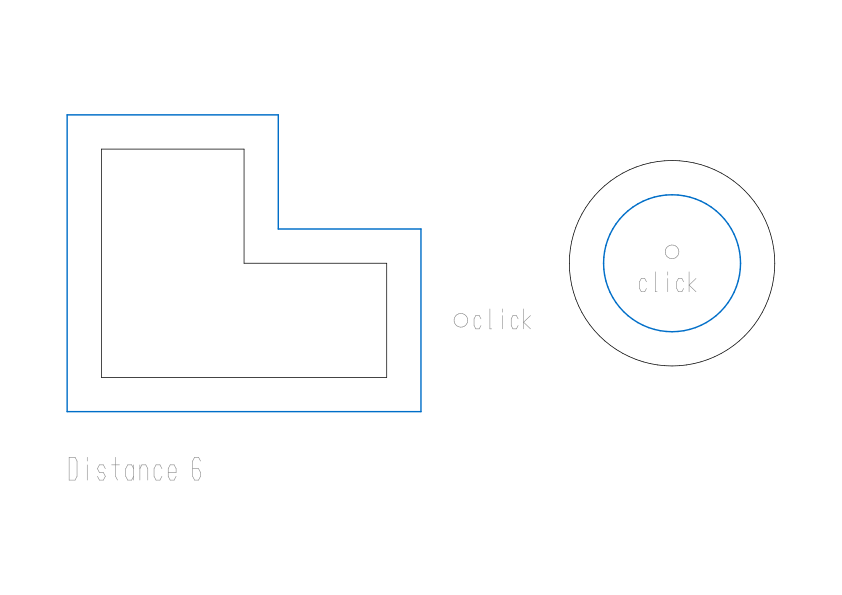
Before you click the side, the copy is drawn under the cursor, so you can see where it will go.
Instead of typing the distance, you can click two points. Musa CAD then asks Specify second point: and uses the distance between them.
Options
Section titled “Options”| Option | What it does |
|---|---|
Through (T) | No fixed distance. After you pick the object, click a point and the copy passes through it. The side prompt becomes Specify through point or [Exit/Multiple/Undo] <Exit>:. |
Erase (E) | At the distance prompt. Asks Erase source object after offsetting? [Yes/No] <No>:. With Yes, the original is deleted once the copy is made. |
Layer (L) | Asks Enter layer option for offset objects [Current/Source] <Source>:. Source puts the copy on the original’s layer, Current on the current layer. |
Exit (E) | At the object and side prompts. Ends OFFSET, the same as Enter. |
Multiple (M) | Keep clicking to make more copies. Each new copy steps out from the one just made, so you get evenly spaced rings or lines. Press Enter to go back to picking an object. |
Undo (U) | Removes the last copy. Each Undo removes one more. |
| Enter at the distance prompt | Keeps the distance shown in <>, or Through. |
Settings OFFSET remembers
Section titled “Settings OFFSET remembers”The distance (or Through), Erase and Layer are kept for the next time you use OFFSET, for as long as Musa CAD stays open. The first line of each run shows Erase and Layer, and the distance prompt offers the last distance in <>.
The same line shows OFFSETGAPTYPE. It decides what fills a polyline’s outside corners when the copy pulls its straight segments apart: 0 carries the segments on until they meet (a sharp corner), 1 puts an arc there, and 2 cuts the corner with a bevel. Type OFFSETGAPTYPE to change it. See OFFSETGAPTYPE.
Good to know
Section titled “Good to know”- Lines, arcs, circles, polylines, construction lines and rays can be offset. An ellipse or a spline gives a spline. Anything else says
Offset: can't offset that entity. - The copy has the original’s layer, colour, linetype, lineweight and linetype scale. With Layer set to Current, it goes on the current layer instead.
- A distance of 0 or less is refused with
Value must be positive and nonzero. - An inward copy that would shrink to nothing is refused. A circle or arc says
Offset distance too large (would collapse the curve)., a polyline saysOffset distance too large for this polyline., and an ellipse or spline saysOffset distance too large for this curve (the offset would cross itself). - With Through, a point right on the object is refused with
Offset: the through point lies on the object. - Each copy is its own undo step, both inside OFFSET and with U afterwards.
- To offset an outline drawn as separate lines in one go, first join them into one polyline with JOIN.
Compared with AutoCAD
Section titled “Compared with AutoCAD”OFFSET uses AutoCAD’s prompts and options: Through, Erase, Layer, and Multiple, where each copy steps out from the last. As in AutoCAD, an ellipse or a spline offsets to a spline.
- Join separate lines into one polyline first with JOIN.
- Round the corners of the new outline with FILLET.
- See all the editing commands together in Modifying objects.