
TEXT
Create a single-line text object.
- Type
- TEXT or DT or DTEXT
- On the ribbon
- Home › Annotation › Text › Single Line
- Annotate › Text › Multiline Text › Single Line
- Since
- Musa CAD 0.1.0
What it asks first
Command: TEXTCurrent text style: "Standard" Text height: 2.5000 Annotative: No Justify: LeftSpecify start point of text or [Justify/Style]:Read from Musa CAD 0.8.0 itself (musacad --dump-wiki-data), so these facts always match the release this wiki is built for (0.8.0).
TEXT writes single-line text: labels, notes, part numbers. Each line you type becomes its own text object, and the next line starts under the last one, so you can write a short list in one go.
How it works
Section titled “How it works”Type DT and press Enter. Musa CAD first shows the current text style, height and justification. Click where the text starts, give the height and the angle, then type the text. Press Enter at the end of each line. Press Enter on an empty line to finish.
Command: DTCurrent text style: "Standard" Text height: 2.5000 Annotative: No Justify: LeftSpecify start point of text or [Justify/Style]: 10,20Specify height <2.5000>: 5Specify rotation angle of text <0>: EnterEnter text: PART NO. 1042Enter text: SCALE 1:5Enter text: Enter2 lines of text placed.While you type, the line shows on the drawing where it will stand. Each new line goes under the one before, 5/3 of the text height lower. The rotation is an angle in degrees: 0 is normal, left-to-right text, and 90 runs upwards.
At Specify height and Specify rotation angle of text you can also click a point. The height is then the distance from the start point to your click, and the angle is the direction from the start point to your click.
Options
Section titled “Options”| Option | What it does |
|---|---|
Justify (J) | Asks Enter an option [Left/Center/Right/Align/Middle/Fit/TL/TC/TR/ML/MC/MR/BL/BC/BR]: and sets which part of the text sits on the point you give. See Justification below. Enter keeps the current one. |
Style (S) | Asks Enter style name or [?] <Standard>:. Type the name of a text style to use it, and it becomes the current style. Type ? to list the styles. Enter keeps the current one. |
A justification, such as MC, at the first prompt | Sets that justification straight away, without going through Justify. |
| Enter at Specify height or Specify rotation angle of text | Keeps the value shown in the angle brackets. |
| Enter on an empty line at Enter text | Ends the command. |
Justification
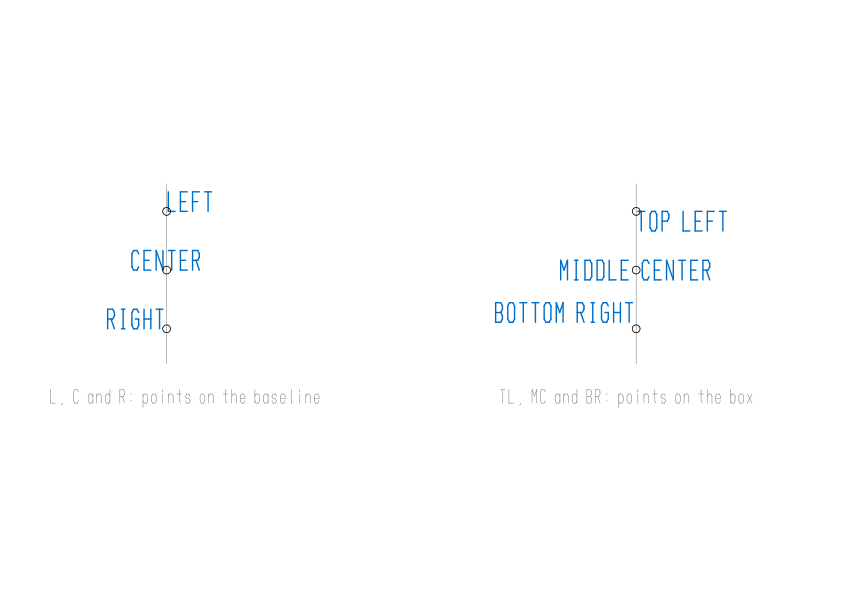
Section titled “Justification”Justification decides which point of the text is fixed to the point you click. Musa CAD offers fifteen. After you choose one, the first prompt changes to ask for that point.
| You type | Justification | Musa CAD asks |
|---|---|---|
L or Left | Left | Specify start point of text: |
C or Center | Center | Specify center point of text: |
R or Right | Right | Specify right endpoint of text baseline: |
A or Align | Aligned | Specify first endpoint of text baseline:, then Specify second endpoint of text baseline: |
M or Middle | Middle | Specify middle point of text: |
F or Fit | Fit | Specify first endpoint of text baseline:, then Specify second endpoint of text baseline: |
TL | Top left | Specify top-left point of text: |
TC | Top center | Specify top-center point of text: |
TR | Top right | Specify top-right point of text: |
ML | Middle left | Specify middle-left point of text: |
MC | Middle center | Specify middle point of text: |
MR | Middle right | Specify middle-right point of text: |
BL | Bottom left | Specify bottom-left point of text: |
BC | Bottom center | Specify bottom-center point of text: |
BR | Bottom right | Specify bottom-right point of text: |
What the words mean:
- The baseline is the line the capital letters stand on. Left, Center and Right put your point on the baseline, at its start, middle or end.
- Top is the top of the capitals. Bottom is lower than the baseline: it is where letters such as g and p hang down to.
- Middle (
M) is the middle of the whole text box, the hanging letters included. Middle center (MC) is half a capital’s height above the baseline. The two are close but not the same. - Align runs the text from the first point to the second. Musa CAD makes the letters as tall as they need to be to fill that length, so it does not ask for a height or an angle.
- Fit also runs the text between two points, but keeps the height you give. The letters are made wider or narrower to fill the length. It asks for the height, not the angle.
Command: DTCurrent text style: "Standard" Text height: 5.0000 Annotative: No Justify: LeftSpecify start point of text or [Justify/Style]: ASpecify first endpoint of text baseline: 0,0Specify second endpoint of text baseline: 80,0Enter text: SECTION A-AEnter text: Enter1 line of text placed.Text codes
Section titled “Text codes”Some characters are not on the keyboard. Type these codes in the text and Musa CAD draws the symbol. The letter after %% can be small or capital.
| You type | You get |
|---|---|
%%d | ° degree sign |
%%p | ± plus-minus sign |
%%c | ⌀ diameter sign |
%%b | ⌴ counterbore or spotface |
%%h | ↧ depth |
%%v | ⌵ countersink |
%%% | a single % |
%%o | turns an overline on, and off again the second time |
%%u | turns an underline on, and off again the second time |
%%nnn | the character with that number, from 1 to 255. %%176 is °. |
\U+XXXX | any character by its four-digit Unicode number, such as \U+2316 for the position symbol. |
For example, %%c25 %%p0.05 shows as ⌀25 ±0.05, and 45%%d shows as 45°.
The text keeps the codes as you typed them. When you edit it later, you see the codes, not the symbols. A code Musa CAD does not know stays as typed. \U+ needs exactly four hex digits after it.
Text can also show live values called fields, such as %<Date>%, %<Time>%, %<Filename>% and %<Login>%. See FIELD.
Good to know
Section titled “Good to know”- The height, rotation and justification you use are remembered for the next TEXT. The height is the TEXTSIZE setting.
- The remembered justification shows at the end of the first line, for example
Justify: Middle center, and the first point you give uses it. TypeLat the first prompt to go back to Left. - If the text style has a fixed height, Musa CAD does not ask for the height.
- Each line is its own object and its own undo step. U after TEXT removes the last line only.
- A height of 0 or less is refused with
Value must be positive and nonzero. - A style name that does not exist gets
Cannot find text style "NAME".(with the name you typed). - For Align and Fit, the same point twice gets
The two endpoints must differ. - Esc ends the command. The lines you already placed stay.
- To change the words later, double-click the text, or use TEXTEDIT. To change the justification without moving the text, use JUSTIFYTEXT.
Compared with AutoCAD
Section titled “Compared with AutoCAD”TEXT follows AutoCAD’s flow: the same prompts, all fifteen justifications, and the same spacing of 5/3 of the height from line to line. The %% codes are AutoCAD’s; Musa CAD adds %%b, %%h and %%v for hole callouts, and \U+XXXX works in single-line text as well as in MTEXT.
- Write a paragraph that wraps inside a box with MTEXT.
- Change the font and height for many texts at once with STYLE.
- Read about notes, dimensions and leaders in Annotation.