
MLEADER
Draw a multileader: an arrowhead, a leader line and a landing, and its text.
- Type
- MLEADER or MLD
- On the ribbon
- Annotate › Leaders › Multileader
- Since
- Musa CAD 0.8.0
What it asks first
Command: MLEADERSpecify leader arrowhead location or [leader Landing first/Content first/Options] <Options>:Read from Musa CAD 0.8.0 itself (musacad --dump-wiki-data), so these facts always match the release this wiki is built for (0.8.0).
MLEADER draws a note with an arrow pointing at something. A multileader has four parts: the arrowhead, the leader line, a short horizontal landing, and the text beside the landing. They stay together as one object.
How it works
Section titled “How it works”Type MLD (or MLEADER) and press Enter. Click where the arrowhead should point. Then click where the leader should end: this is the landing location. Type the note and press Enter. The multileader is drawn and the command ends.
The landing and the text go to the right if the landing location is to the right of the point before it, and to the left if it is to the left.
Command: MLDSpecify leader arrowhead location or [leader Landing first/Content first/Options] <Options>: (click the edge of the hole)Specify leader landing location: (click up and to the right)Enter annotation text: DRILL THROUGHMultileader placed.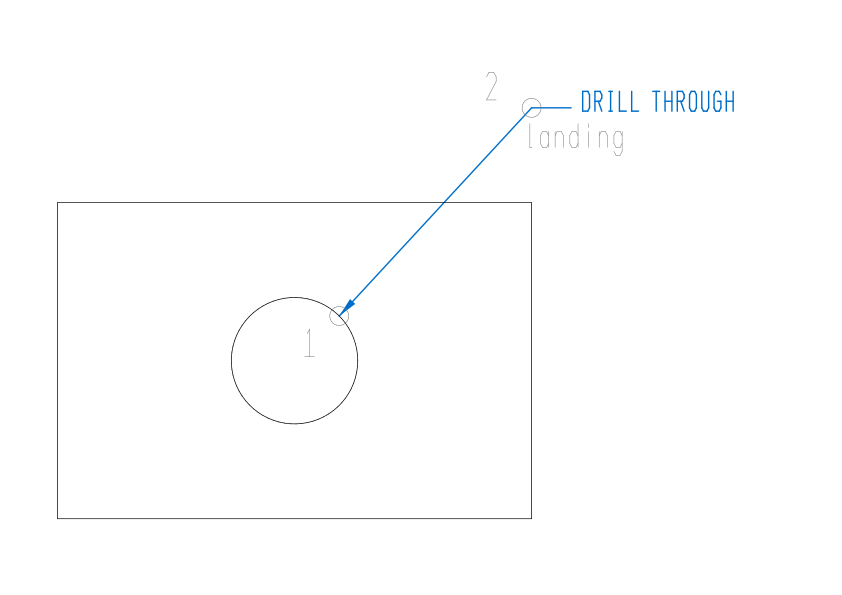
Start from the landing or the text
Section titled “Start from the landing or the text”You can place the parts in another order. Type L at the first prompt to click the landing first, or C to place the text first. Musa CAD then asks for the arrowhead last.
Command: MLDSpecify leader arrowhead location or [leader Landing first/Content first/Options] <Options>: CSpecify location of the text or [leader arrowHead first/leader Landing first/Options] <Options>: (click where the note goes)Enter annotation text: SEE NOTE 3Specify leader arrowhead location: (click what the note points at)Multileader placed.With leader Landing first, the prompts are Specify leader landing location or [leader arrowHead first/Content first/Options] <Options>:, then Specify leader arrowhead location:, then the text.
Options
Section titled “Options”These are offered at the first prompt.
| Option | What it does |
|---|---|
leader arrowHead first (H) | Click the arrowhead first, then the landing. This is how MLEADER starts. |
leader Landing first (L) | Click the landing location first, then the arrowhead. |
Content first (C) | Click where the text goes and type it first, then click the arrowhead. |
Options (O) | Opens more settings for this leader (see below). Enter at the first prompt does the same. |
More settings
Section titled “More settings”Options asks Enter an option [Leader type/leader lAnding/Content type/Maxpoints/First angle/Second angle/eXit options] <eXit options>:. After each setting it asks again, until you choose eXit options.
| Option | What it does |
|---|---|
Leader type (L) | Select a leader type [Straight/sPline/None] <Straight>:. Straight draws straight segments, sPline a smooth curve, and None no leader line at all. Enter keeps the type you have. |
leader lAnding (A) | Use landing [Yes/No] <Yes>:. No leaves out the short horizontal landing. |
Content type (C) | Select a content type [Mtext/None] <Mtext>:. None draws the leader with no text, so Musa CAD does not ask for any. |
Maxpoints (M) | Enter the maximum points for leader line <2>:. How many points the leader has, counting the arrowhead and the landing location. With 3 or more, Musa CAD asks Specify next point: for the bends between them; press Enter there to use the last point as the landing. |
First angle (F), Second angle (S) | Not available yet. Musa CAD says Angle constraints are not available yet. |
eXit options (X) | Goes back to the first prompt. Enter does the same. |
For example, this draws a leader with one bend:
Command: MLDSpecify leader arrowhead location or [leader Landing first/Content first/Options] <Options>: EnterEnter an option [Leader type/leader lAnding/Content type/Maxpoints/First angle/Second angle/eXit options] <eXit options>: MEnter the maximum points for leader line <2>: 3Enter an option [Leader type/leader lAnding/Content type/Maxpoints/First angle/Second angle/eXit options] <eXit options>: XSpecify leader arrowhead location or [leader Landing first/Content first/Options] <Options>: (click)Specify next point: (click the bend)Specify leader landing location: (click)Enter annotation text: CHAMFER ALL EDGESMultileader placed.Good to know
Section titled “Good to know”- MLEADER starts with the settings of the current multileader style: its arrowhead, landing, text height, number of points and leader type. Changes made with Options apply to this one leader only. To change them for every new leader, use MLEADERSTYLE.
- A multileader keeps following the multileader style it was drawn with. Modify that style, and its arrowhead, text height, landing and leader type change too.
- Maxpoints takes a whole number from 2 to 99. Anything else is refused with
Requires a whole number from 2 to 99. - Block content is not available yet: typing
Bat Content type saysBlock content is not available yet. - The whole multileader is one object and one undo step. Esc cancels without drawing anything.
Compared with AutoCAD
Section titled “Compared with AutoCAD”MLEADER has AutoCAD’s prompts and options. Block content and the First angle and Second angle settings are not available yet, and there is no MLEADERCOLLECT.
- Add or remove leader lines on a multileader with MLEADEREDIT.
- Line up the text of several multileaders with MLEADERALIGN.
- Set the arrowhead, landing and text for new multileaders with MLEADERSTYLE.